Early Trials
We decided early on that we wanted the track for our train to be raised. We wanted it off the ground because the yard occasionally floods (both from heavy rains and extremely high tidal events) and we didn't want to be digging through the existing garden plants to lay the railbed. But we wanted it low enough so it was easy to step over and get to the plants inside. About 6 to 12 inches off the ground would work.
So I looked online for some ideas. One idea was to use PVC deck boards as the base. They would stand up to the weather and provide a nice firm base. I could even make trim pieces as rails on the edges with trim pieces and fill in with ballast. I got a couple of pieces to practice with and the first attempt looked good. A short straight piece with the rails separated from the board by a couple of washers so rain water could flow out. And then I tried the first curve.... Not so good. The boards were only just slightly wider than the ties on the track. As soon as the track started to turn, the inner side of the ties hit the trim pieces.
The second attempt was to use some wider deck boards that I had for our pier. These were six inches wide and gave more room for the track to sit on them. And maybe I didn't really need the ballast so I wouldn't need the trim pieces on the sides. I used a template from online and started cutting pieces. I should probably interrupt here and brag about my handymanness.
OK, now that's over. Yes, I'm not particularly handy and therefore, don't have extensive experience or a wide range of tools. So I was doing this cutting freehand with a circular saw and a guide. So try as I might, the edges never matched up quite right. But maybe that would come with practice.
Each segment was screwed together using a square of plywood underneath.
To make stuff manageable, I linked a few of these pieces together into the end turns and some straightaways.
At this point I could actually lay down some track on it
and run the engine around.
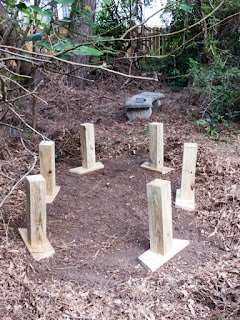
The next step was to raise it up so I could put it in the yard somewhere. For this I used an idea I got from Family Garden Trains for a temporary setup. I had actually used their template for cutting the pieces for going around the curves (although I had trouble printing it at the right aspect ratio so I ended up making my own). I would cut pieces of 4x4 wood and then mount a foot on the bottom and the oval on top.
But going back to my lack of tools my circular saw wasn't big enough to make it through the 4x4's. I tried using my mitre box as a guide and make cuts from the top and bottom. If they were well lined up, I would have a clean cut. If not, it would either be a bit rough (usually was) or it would look like I was cheating at Jenga.
It finally all came together.
And the final installation!!!!
So I looked online for some ideas. One idea was to use PVC deck boards as the base. They would stand up to the weather and provide a nice firm base. I could even make trim pieces as rails on the edges with trim pieces and fill in with ballast. I got a couple of pieces to practice with and the first attempt looked good. A short straight piece with the rails separated from the board by a couple of washers so rain water could flow out. And then I tried the first curve.... Not so good. The boards were only just slightly wider than the ties on the track. As soon as the track started to turn, the inner side of the ties hit the trim pieces.
The second attempt was to use some wider deck boards that I had for our pier. These were six inches wide and gave more room for the track to sit on them. And maybe I didn't really need the ballast so I wouldn't need the trim pieces on the sides. I used a template from online and started cutting pieces. I should probably interrupt here and brag about my handymanness.
 |
| Free photo 102707061 © Publicdomainphotos - Dreamstime.com |
OK, now that's over. Yes, I'm not particularly handy and therefore, don't have extensive experience or a wide range of tools. So I was doing this cutting freehand with a circular saw and a guide. So try as I might, the edges never matched up quite right. But maybe that would come with practice.
Each segment was screwed together using a square of plywood underneath.
To make stuff manageable, I linked a few of these pieces together into the end turns and some straightaways.
and run the engine around.
The next step was to raise it up so I could put it in the yard somewhere. For this I used an idea I got from Family Garden Trains for a temporary setup. I had actually used their template for cutting the pieces for going around the curves (although I had trouble printing it at the right aspect ratio so I ended up making my own). I would cut pieces of 4x4 wood and then mount a foot on the bottom and the oval on top.
But going back to my lack of tools my circular saw wasn't big enough to make it through the 4x4's. I tried using my mitre box as a guide and make cuts from the top and bottom. If they were well lined up, I would have a clean cut. If not, it would either be a bit rough (usually was) or it would look like I was cheating at Jenga.
It finally all came together.
And the final installation!!!!
And it runs!!!
It was a small loop and I was never able to get it very level. I had only options for coarse adjustments for the height of each leg and as mentioned above, the legs weren't necessarily square. That was too many degrees of freedom for me to manage. I also found that the joints weren't as strong as I expected and it drooped in a few places. I made more legs but that seemed to just move the problems around and not solve them.
My parents visited shortly after I finished the set-up and one nice night we had take-out around the fire pit with the train running in the background. At least until the train started derailing.
I played with it a few more times but it definitely wasn't the approach I wanted to use for a permanent installation. Never mind, it was always going to be a practice run.
Back to the Internet for more cat videos. ... I mean train platform ideas.


Comments
Post a Comment